Timepiece
Now is the time to hold up my hands and admit to my sins.
My last 7 blips were all 360° panoramas - on a micro scale - from either the centre of the flower, or the apex of the stem.
They were inspired by seeing blips posted where 360° panoramas had been converted into mini-planets by using a polar coordinates distortion. That technique is described here here.
I wondered whether the same filter could be used in reverse to change a circular image into a panorama. The answer was 'yes' (certainly in GIMP, possibly in other image processors too). Once the panorama was made, the colours, contrast and saturation were tweaked a little more than I usually do.
So apart from the use of the reverse polar coordintes filter, there wasn't much jiggery-pokery involved.
(Oh yes, in one or two of them the true colours were altered with the rotational colour mapping filter.)
Some of you were guessing at the panorama idea (I think AJTaylor was the first)
The true identity of each image is given below (linked to each blip).
#1 - A lilac coloured Aquilegia in my garden
#2 - Red Valerian in my garden
#3 - Dandelion seedhead with most seeds removed
#4 - Ornamental Cabbage from a supermarket bunch of flowers
#5 - Red Gerbera from the same bunch
#6 - Dogrose on nearby wasteland
#7 - Hardy Osteospermum + fly in my garden
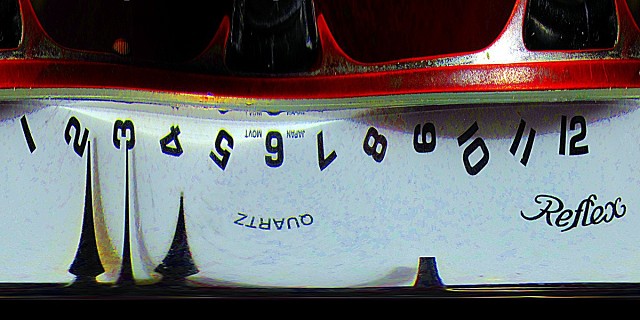
#8 (The image above) - A cheap analogue watch.
If you want to compare the final result with the original unaltered camera image, then you can do so on my Flickr site. in my Reverse Polar Coordinates Set.
Only read beyond here if you want the technical details.
--------------------------------------------------------
=====================================
Step by Step Instructions Using GIMP
=====================================
Take picture of any roughly circular subject centred approximately within the frame.
(I underexposed by 1 stop to have higher initial colour saturation.)
Load into GIMP
Duplicate the layer
Use the 'Move' tool to drag the layer: click on the perceived centre of the subject then slide until the cursor coordinates indicate you are at the true centre.
Image >> Canvas size >> (unlinked) adjust to give largest square possible, centre before resizing.
Flatten image.
Filters >> Distorts >> Polar Coordinates
Uncheck 'To polar' and uncheck 'Map From Top' then OK
Image >> Scale image >> (unlinked) halve the height.
Make three duplicate layers a, b and c
Layer a: Colours >> Auto >> Colour Enhance
Layer b: Colours >> Auto >> White Balance
Layer c: Colours >> Auto >> Equalise
I generally changed the layer mode to 'Multiply' for layer c
Reduce the opacity of each of these layers to form a blend with the base layer. Adjust until best mix achieved.
Flatten the image
I then used Colours >> Map >> Rotate colours to map a 90° sector centred on green to a 60° sector centred on blue.
Repeat with other colours as desired.
(Work on a duplicate layer so that it may be blended with the one below if the effect is too strong.)
Adjust contrast with curves.
Adjust sharpness with 'unsharp mask'.
Save result.
Have Fun
Comments
Sign in or get an account to comment.


