Who Would Have Thunk It?
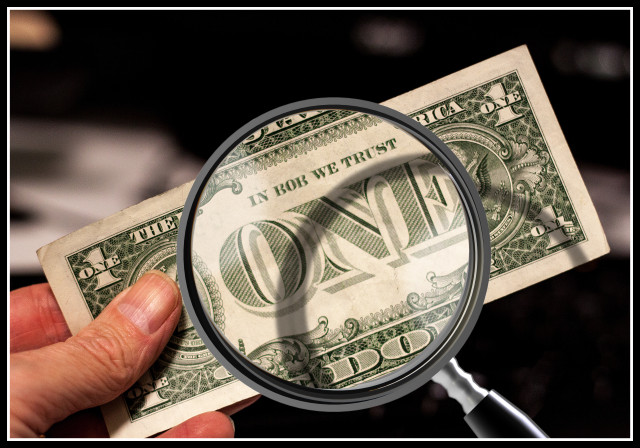
I get a mention on the back of a dollar bill!
This picture satisfies 3 challenges today,
~ Day 1 of DDW's February alphabet challenge - A is for American dollar
~ Week 1 of mine and Bomber's technical challenge - my wildcard
~ Missymoo's prop challenge - the dollar bill
Rules of the game for the technical challenge are that when you play your wildcard, you explain what it is you've done so that others can appreciate the picture, so here goes.
This is an example of a composite picture created in Photoshop (several images or layers combined to make a single picture). Think of a layer as a sheet of clear plastic (think overhead projectors) with one part of the whole image painted on it. When you place the layers over the top of each other, you can see through from top to bottom except where there is something painted on a layer; you see that as part of the final image. The layers in this image from top to bottom are:
10 - Two white semicircle blobs of white forming the reflection on the magnifying glass
9 - The magnifying glass
8 - The shadow of the magnifying glass seem through the lens
7 - The shadow of the magnifying glass falling on the dollar bill
6 - The 1st part of the 1st letter B in BOB
5 - The 2nd part of the 1st letter B in BOB
4 - The 1st part of the 2nd letter B in BOB
3 - The 2nd part of the 2nd letter B in BOB
2 - An enlarged circular portion of the dollar bill spherized and placed inside the magnifying glass lens aperture
1 - The base image which is me holding the dollar bill
The biggest challenge here was creating the letter B in a matching font, and even if I say so myself, I was rather pleased with the solution to that. I copied the R from the word TRUST, duplicated it, flipped the duplicate upside down and then aligned it over the other R so that the two circles in the two Rs formed a B. Using a layer mask and a soft brush, I simply removed the unwanted bits and blended the edges so you can't see the joins. For anyone unfamiliar with layer masks, think of them as a way of erasing part of the image in a layer in a non destructive way. To erase, you paint the area with a black brush which acts like an eraser. To restore the image, paint with a white brush and it restores what you previously erased. A soft brush will feather the edges whereas a hard brush creates a sharp edge. Think of it like the difference between using an old worn eraser with a soft rounded edge Vs a brand new rubber with a hard chiseled edge.
Hope someone at least finds this useful :-)
421
views
- 8
- 3
- Canon EOS 50D
- 1/20
- f/2.5
- 50mm
- 400
Comments
Sign in or get an account to comment.


