Homework for a wet weekend - making spore prints
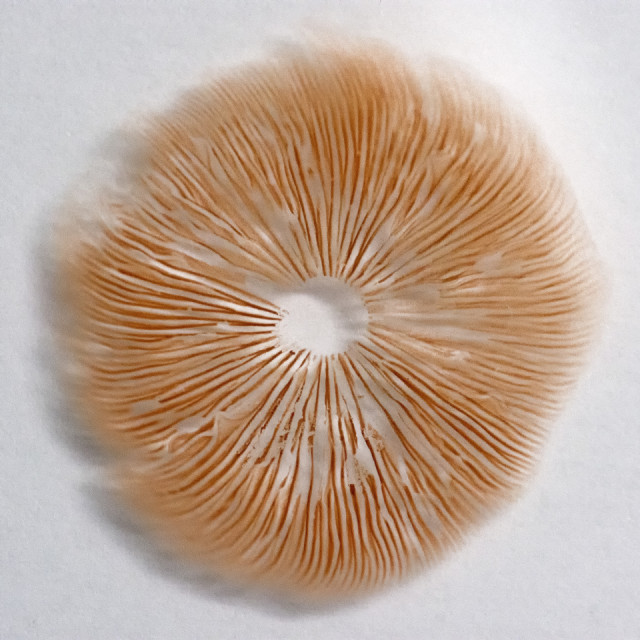
Star Pinkgill, Entoloma conferendum.
Nikon D7200
Tokina 100mm f/2.8
f9 1/100 ISO 2000
A few species of fungi are instantly recognizable, but most require further study for identification. Spore prints are a useful intermediate between macroscopic features visible in photographs and structures which can only be seen with a microscope.
How to make a spore print:
1. First catch your fungus. English law requires that you have the permission of the landowner before taking any specimens. SSSIs have further legal protection and a few species of fungus are protected by law - you'll need licences from Natural England or from the Home Office to collect these but you're not likely to encounter them. Does collecting fungi impact on their abundance in future years? It is commonly thought that it does but recent scientific research has shown that intensive repeated gathering of fungi does not reduce populations. How can that be? A fungus fruiting body (the bit that you can see) is only one part of a fungal colony. The vegetative part that does all the hard work (the mycelium) is hidden and unless this is destroyed will continue gathering nutrients and producing fruiting bodies in future seasons. What removing fruiting bodies (toadstools) does do is reduce the ability of the fungus to disperse to new sites, and it also eliminates the possibility of other people being able to observe and enjoy them!
2. Choose your specimen carefully. It needs to be mature - gills or pores visible - but not too far gone. Too old or too young won't work. Take it home a prepare a spore print as soon as possible. Don't put it in the fridge as the low temperatures interfere with sporulation in some species.
3. Carefully cut the stem (stipe) off and stick a cocktail stick or toothpick into the top of the cap (you'll see why later!).
4. Place the cap gills/pores down on a collecting substrate. Most sources recommend using paper as a substrate - white paper for species with dark spores and dark coloured paper for those with pale spores - but a sheet of glass is better. Glass won't get soggy like paper can do and it also allows you to lift the sheet carefully and observe from underneath to see how the spore print is progressing. Best of all, when you have your spore print you can place the glass on white paper if the spores are dark or a dark surface if they are pale - useful if you don't know what colour the spore print will be in advance!
5. Cover the cap with something to prevent disturbance. A glass is often recommended for this but unless you have some ventilation holes you risk condensation and drips which result in a soggy mess! Plastic food packaging trays from supermarkets work very well (especially the clear ones).
6. Leave the specimen undisturbed at cool room temperature until the spore print is ready. This can be anything from one hour to a week but it typically 12-24 hours. Looking up through the glass from underneath is the best way to tell when it's ready.
7. CAREFULLY lift the cap vertically upwards without disturbing the spore print. This is where the cocktail stick or toothpick is useful! Be very careful not to disturb the print with drafts and don't breathe the spores in, they can cause allergies.
8. Place the glass on a contrasting background and take photographs. Then clean up carefully and avoid contaminating your house with fungal spores.
With a bit of practice you can have hours of fun with fungi and your spore prints will help you identify many more species. It doesn't work every time but it's great when it does. And a final warning - be aware that if your spore print is disrupted by uninvited guests, they will disperse rapidly in all directions as soon as you remove their food source by lifting the cap, so don't do this on the kitchen table unless your partner is really keen on maggots (Extra :-)
254
views
- 11
- 1
Comments
Sign in or get an account to comment.


