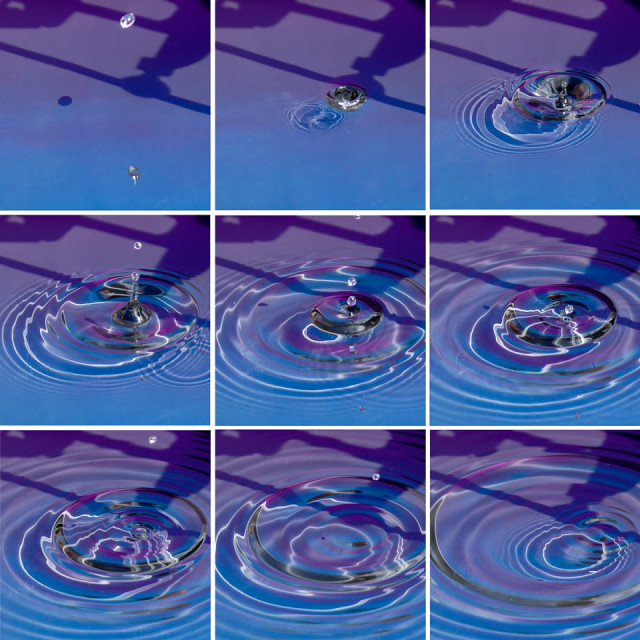
The Life Cycle of a Water Droplet
As today marks the end of five years of blipping I thought I ought to do something which encapsulates part of my journey in blipping. Through the need to produce an image every day I have been encouraged to try a load of new techniques and different subject matter. I have often used a montage presentation as I hope it creates something which is greater than the sum of its parts. I was quite new to action photography and have enjoyed finding my way through 4K video capture as a way of freezing the action. I fell in love with water droplet photography en route courtesy of a number of previous blippers. Initially I did this through flash photography in a studio set up but this was very hit and miss, without specialist equipment time the shots, and then decided to try it in the open air using 4k video capture. Given that 4k video gives you the equivalent of 30 shots a second this meant you could follow a whole sequence through and that is what I have chosen to do in my anniversary blip. It takes approximately 10 shots for a water droplet to fall, rise up and settle down so that's about 1/3 of a second and that is what my sequence represents.
I have also decided that after five years to give myself the option of not blipping every day but only putting up images when I think I have something worthwhile or different. I did this for six months previously but was disappointed just how much my level of blipping dropped so reverted to everyday blipping but this time think I will probably welcome a break just to get the creative juices running again.
I have learnt a great deal through blipping every day - masses of subjects that I would not have considered previously and a whole range of new techniques.
What I have learnt is that it pays to have a camera with at all times even if its only a compact or a mobile phone. You constantly need to be on the look out for photo opportunities so keep your eyes peeled. However, it is also well worth the effort to learn new techniques and make detailed preparation of some of your images.
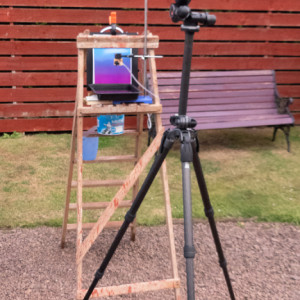
For any of you who might be thinking of trying water droplet photography if you have 4k video capture you do not need an elaborate set up as I illustrate in my extra. You don't need the steps any flat surface will do but I just like to have things at eye level. You need a wide water container, oven tins are ideal especially if they have a back coated interior. Mine was just painted with matt black paint. I use a small plastic tap and tubing for an aquarium for dispensing the drops (approx cost £5) but you must remember to have the water source higher than the level of the tap. I always manual focus using a millimetre ruler over the oven tin and seeing where the water droplets will fall. This enables you to experiment and get a reasonable depth of field (3-4 cms.). However, you need a high shutter speed at least a 500th of a second and more if possible and this means that you often have to use a fairly high ISO and maybe use noise reduction software on your final images. For a backdrop I use an A4 sheet of glossy paper printed with a colour gradient., which reflects in the water.
Comments
Sign in or get an account to comment.


