
Making Magic / How To Make a Photo Book Online
When I created this photo journal in December of 2011, I named it There Must Be Magic, after the title of a book that my oldest sister gave me back in 1972, when I was a little girl. Here is a paragraph from my blipfoto "about" page that talks about why I picked this title for my journal.
~~~
I chose the name of this photo journal from a book my oldest sister gave me when I was seven. The name of the book was There Must Be Magic, and my oldest sister had written this note inside: "May you always find the magic." Photography is a focal point for me: it helps me look for, and find, the magic in everyday life.
~~~
While doing some organizing over the Christmas break, I came across that little book and got it out to look at it. In the past year, I have created three little photo books of my own, using a combination of pictures I've uploaded to blip as well as many, many others that never appeared here (oh, the tyranny of the one-photo-a-day rule!).
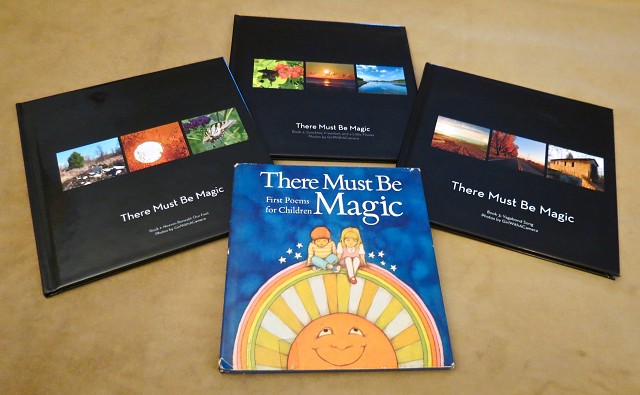
In this picture, you can see the original book that inspired the name of this blog, along with the three little books I've made myself. The name of all of my books so far is There Must Be Magic, but the subtitle of each is different. Here are the subtitles of the three books and the quote that appears inside each one:
Book 1
Heaven Beneath Our Feet
"Heaven is under our feet as well as over our heads." - Henry David Thoreau.
Book 2
Sunshine, Freedom, and a Little Flower
"Just living is not enough," said the butterfly; "One must have sunshine, freedom, and a little flower." - Hans Christian Andersen.
Book 3
Vagabond Song
"There is something in October sets the gypsy blood astir; we must rise and follow her, when from every hill of flame she calls and calls each vagabond by name." - Bliss Carman, Vagabond Song.
Just before Christmas, one of my friends asked me if I could share with her the steps that I used to create my photo books. It was something she was thinking about doing, but she was a little intimidated. I put together a cheat sheet for her (that was longer than it should have been, but hey, I like to be thorough!). I've cut and pasted the process that I shared with her below, in case it may be helpful for others.
One quick disclaimer is that I am located in the U.S. I know that many of the members of blip are international folks, so I'm not sure what sorts of photo book options there may be for everyone else not based in the U.S. The process shared below is based on my experience with Shutterfly. Before selecting an online company to make your own book, it would probably be best to investigate what options are best for you, based on where you live.
-----------------------------------------------------
How To Make a Photo Book Online
1. Take LOTS of pictures, using a variety of settings, and upload them to your computer. I'm on a Mac that came equipped with an easy-to-use photo program called iPhoto, so that's the one I use.
2. Tag or label your photos with keywords after you upload them, delete the ones that aren't keepers, and develop a system for labeling or flagging favorites. I have a set of about 30 keywords that I consistently try to remember to use. For instance, I have a blipfoto keyword that I use to tag any picture I've uploaded to my blipfoto account. Some keywords relate to the subject of the picture, and others identify where the pictures were taken (such as Millbrook Marsh, Arboretum, Skytop Farm Pond). Also, every time I upload a set of pictures, I review them right away and flag a handful that are my favorites.
3. Be sure to BACK UP your photo collection! This is important! You should always have the original photo library PLUS a back-up that is kept on a separate device. Also, ideally, you would keep the original and back-up copies in separate locations (for example, one at the office, one at home).
4. When planning a new photo book, think of a theme or a unifying concept for the book. Or maybe you want to make a SERIES of little books? Then go through your photo collection and find the specific items you'd like to include - here's where keywords and flags help. Use a keyword of some kind to label the ones you then select to include in your book. I picked out the ones I wanted to use in Book 1, and then I used the keyword Book1 on all of them. The ones I wanted for Book 2, I labeled Book2, etc.
5. If you plan to do a series of books, you might decide up front on a common design or title or theme that unifies them all. For instance, my three little books all have a similar design, title, cover page layout, and back cover. The back cover of each includes a different silly picture of our tabby, Dexter (hey, it's my book; I can do whatever I want!). I also came up with a name for my own publishing company: Skittering Vole Press. On the back cover of each book, near the picture of Dexter, is this statement: "A tiny little publication of Skittering Vole Press." For each of my books so far, the only words inside each book are a quote that I selected to represent much of the content of the book; I called the series so far There Must Be Magic, but each book's subtitle, I derive from the unique quote I've picked.
6. Be realistic about how many photos you can include in one book. I initially identified about 150 photos for my first little 8-inch-by-8-inch book, but in reality, the 20-page book only fit about 85 photos. So be prepared to winnow down your collection, or select a book with more pages (more pages will cost more $$ as well).
7. Make any edits to the photos that you might want/need to make (I did this in iPhoto). This would include increasing the exposure for dark shots, straightening the photo (especially if there are lines in it that people would expect to line up with the horizon), retouching, etc.
8. Export the ones that you want to use onto a flash drive. iPhoto gives various options for sizes of photos when you export; I usually pick "large." Large gives me about a 4 MB file, medium gives me about a 2 MB file.
9. Go through the photos on the flash drive and crop the photos as you see fit. (I keep both the original and the cropped version on the flash drive.) Be sure to leave some extra space around any person or object you want to feature in each shot, as you may need to custom crop some of the photos later, depending on the shapes and sizes of pictures you need for your book. For instance, if you are making a SQUARE photo book, you may find yourself using mostly SQUARE photos.
10. Choose an online photo site to use to create your book. The three books I've made so far, I created on Shutterfly. I found their site very user-friendly and I was very satisfied with the quality of pictures in the books they made for me. They also allowed me to create photo books and save them as "projects," work on them over time, and then order them when I was ready. This is a nice feature; it's too overwhelming to make a book in just one sitting!
11. When you've picked the online photo site you want to use, create an account and upload your photos. I think most sites will let you upload in batches and place the photos into folders and groupings. When I uploaded mine, I placed my photos into a single folder I simply called Book1.
12. I did not use much text in the books I made, but you may want to. I would advise that you have most of the text written - maybe in a word document that you can cut and paste from - before you begin creating the book online. The choice of where you want to place the text in relation to each picture will help you select the specific layout for each page.
13. On the site I used, they allowed me options for a "custom path" or a "simple path." The custom path was what I used, and it was quite easy and gave me lots of choices!
14. Think of a name for your book. You will also have some choices about the style for your book. I think the one I picked was called Modern Black, with a shiny black cover. You can also choose what to put on the front cover - one picture? or several? words above the pictures? or below? You will also be able to select font color and style and size. (Before picking a font size, think of who your book is for. If it is for individuals with older eyes, they may appreciate a larger font size.) You will have LOTS of choices about how many photos to put on a page, how to group them, and where to place text in relation to individual photos. The site I picked gave me tons of options for layouts with three pictures, four pictures, etc. I did use a number of different layouts, but tended to like the look best when I matched layouts across a two-page spread: four-photo spread on left, and a matching or mirror four-photo spread on right. In the end, my little books averaged about four pictures per page. Take your time deciding these things; this is the fun part! (At least I think so! If you have little patience for this sort of thing, you might want to pick a "simple path" with fewer choices.)
15. Be sure to include your name or online handle somewhere. And don't forget to include a copyright statement (simple as this: copyright 2013 GirlWithACamera)! I put both on the outside back cover, but you can put this wherever you wish.
16. Get the book ready and then set it aside for a day or two. Come back and look through it one last time, looking at every single thing, doing a final review and edit on any text, and approving final layout. Look closely to make sure that subjects of photos are properly centered, and that everything that you hoped would show up, does. In the first book I made, I realized just before printing it that the square layout I chose for a photo had chopped off part of one of my dragonflies! If this happens to any of your photos, you may need to go back to your flash drive, re-crop your original photo, upload it, and use the modified version instead. I found there were pictures I loved that I did not end up using because the shape of the subject just didn't work in any of the layouts I selected.
17. When you think you are ready to order, watch for specials! Photo books (and shipping) can get quite pricey. Two of the books I ordered, I had been given special promotional codes to use to get each book - 8 inches by 8 inches square, with a hardback cover - for free, but shipping was still about $8 per book. The going rate for an 8-by-8 book with just 20 pages, by the way, appears to be around $25 to $30. Larger sizes cost MORE.
18. Order, enjoy, and share! When I ordered, they sent an immediate e-mail confirmation. A day or two later, they sent me a link and a status update. The link was one I could share with others - in sharing this link, I gave others the opportunity to view my book, even if they didn't have an account with that particular online photo vendor, and an opportunity to order order a copy as well! Copies of your book may also make nifty birthday or Christmas gifts!
19. A final step that I take (yes, I admit I'm a bit obsessive, but the devil is always in the details!) is to go back to the original photos I tagged in iPhoto and update the tags or keywords. I removed the Book1 keyword from any photos that did not actually make it into my first book. This is helpful when creating NEW books later on; I can go back and identify more favorite photos and easily determine whether I've already USED a favorite photo in a prior book!
-----------------------------------------------------
P.S. Here's a shout-out to the sister who gave me the original There Must Be Magic book and wished me such a delightful wish, at such a tender young age. I love you, dear sister, and I thank you for all of the love, encouragement, support, inspiration, and direction - and the occasional sheer whimsy! - you have provided, which has helped to shape my life and make me who I am. Your wish for me has come true! I find magic in my world every day. The magic is in everything, if you just look for it! And yes, there is magic in this camera. And, sister, I think . . . there might just be magic in me too!
P.P.S. A song to accompany this really, really long posting? :-) Why, it just has to be this one: Do You Believe in Magic, performed by the Lovin' Spoonful in 1965, the year after I was born.
P.P.P.S. This is the second in an occasional "how-to" series. For anyone who may be interested, the first how-to blip was:
Tuesday 9 October 2012: Horse Sense / 21 Tips for Photographers.
Comments
Sign in or get an account to comment.


