Quadtych: A Busy Day!
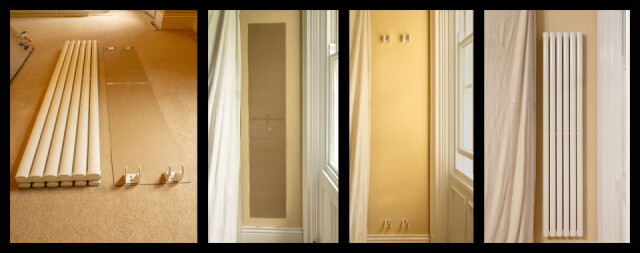
The replacement for the damaged radiator (see last Saturday's blip) arrived safely yesterday, so today was the day for putting it on the wall. As it weighs over 30Kg it needs pretty secure fixings! These 4 photos show the process.
Step One was to make a paper template showing where the holes for the brackets had to be made (it would be good if the supplier provided this: I think I'll suggest it!)
Step Two was to stick the template onto the wall and make small trial holes where the screws had to go, to make sure they'd go into brick rather than mortar (success!). [Error: We should have sorted out the bracket positions before the decorating was done!]
Step Three was to drill deep holes in the wall to screw on the brackets. Chunky plugs and screws were supplied, but the plaster was so thick that I decided I needed longer ones to go well into the underlying brick, so a quick trip to the DIY was called for.
Step Four was to hang the radiator in place - success! My Editor kindly helped me to lift it.
(Actually there were one or two "minor" issues along the way like some screw holes not being in quite the right place in spite of great care being taken...so the radiator was on & off at least half a dozen times. Well they do say that weight-lifting is good for you as you get older!)
The plumbing still needs to be done of course. And there's another radiator to hang on a different wall (even bigger...and heavier - so one or two sons may be called upon to help at some stage).
It'll be nice when it's finished.
Comments
Sign in or get an account to comment.


