
After the storm had passed...
... the fairy lights came out
[finished image on my [url=http://www.blipfoto.com/entry/1317990]Kinda Horrigans[/url] journal]
There really is very little editing on this shot. I brightened it slightly when I processed the RAW file, then cloned a little bit of the leaf from the right hand side which was distracting in Photoshop and used the spot healing tool just to finish it off so that it looked kinda subtle. I sharpened it using sharpen edges and that was it.
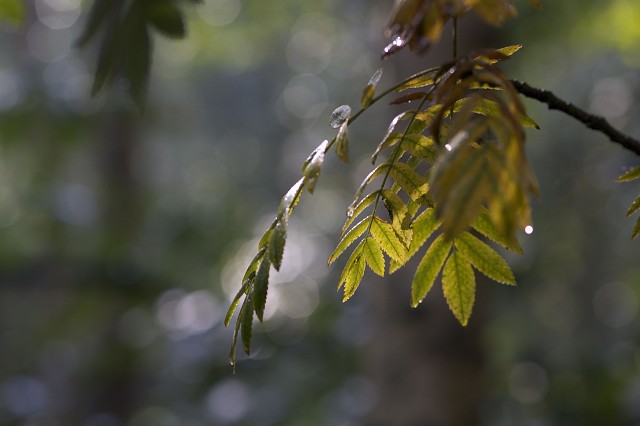
To be honest, this image is all about bokeh. So... here are my 10 'bokeh in plain English' tips:
1. Bokeh is the pretty blur you'll see in images - sometimes it's smooth (which is more a 'normal' kinda blurred background), but the classic thing is lovely points of light, often circles (though you can use different shaped apertures for different effects).
2. Most of it is done in-camera, you can fake it in processing using some programmes / the addition of texture layers - but the best bokeh is real!
3. Which makes it easy to do given the right circumstances!
4. Use a wide aperture - this means a low f-number, f/1.8, f/2.0 etc and set your camera in aperture priority if you can
5. Make sure you're not too far away from your subject
6. Make sure your background is a decent distance away
7. If there are points of light in the background, i.e. street lights, fairy lights, light filtering through tree leaves, then this gives some great bokeh
8. Good light on the subject also helps... backlit subject = interesting light for bokeh-liciousness
9. Don't use a slow shutter speed as your crispy lovely bokeh will blur around the edges
10. Enjoy!
This one was taken just after a storm and there were loads of raindrops on the leaves, hence, oodles of pretty light / green bokeh.
Tip of the day:
Lots more bokeh inspiration in these 27 incredible bokeh photographs
348
views
- 1
- 0
- Canon EOS 50D
- 1/100
- 85mm
- 200
Comments
Sign in or get an account to comment.


