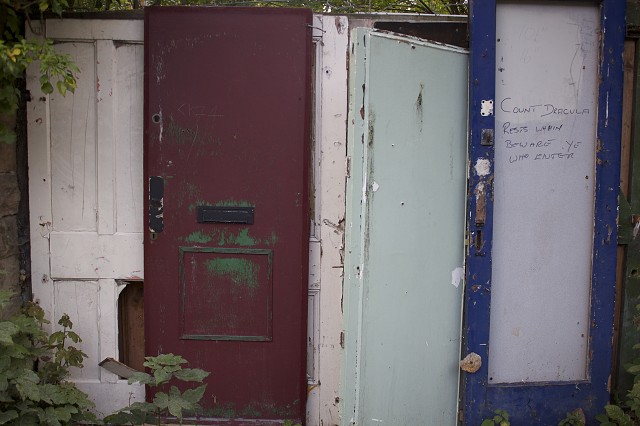
Break on through...
... to the other side.
[final image over on my [url=http://www.blipfoto.com/entry/1329999]Kinda Horrigans[/url] journal]
This was edited by duplicating the background layer, then using the Topaz Adjust filter within Photoshop on a 'Spicify' setting with the saturation toned down a tad and increased noise reduction (mainly because that preset is harsh and then some). Because the background layer has been duplicated, it means that you can play around with the opacity of the layer you adjusted and decrease the strength of the effect / use a layer mask to make further tweaks. The opacity here was reduced by about 25%. Then, to bring out some more of the detail I used a high pass filter set to about 7 pixels and the blend mode set to overlay. Again, the opacity of the layer was reduced a bit so that the effect wasn't too harsh.
Then, one more layer - this time hue / saturation with an increase in saturation (which sounds crackers when I reduced it during the Topaz Adjust bit but bear with me...) to bring out the reds in the door on the left. Using a layer mask and black brush set to 85% opacity, I then painted out the increased saturation on all areas other than the door. If I'd tried to do something similar with the Topaz Adjust layer, then I'd have lost the effect on the textures etc which that layer was bringing out.
Tip of the Day:
Virtually all of the time I use a DSLR camera... but that's not to say that you can't take brilliant shots with a point and shoot and that most of the stuff about editing will work no matter what camera you used (just ignore the RAW file stuff if your camera doesn't do them!). Which reminded me that I saw this article about taking great shots with a point and shoot and I reckon it's a great place to fire you into using any camera for cool images!
314
views
- 0
- 0
- Canon EOS 50D
- 23mm
- 400
Comments
Sign in or get an account to comment.


