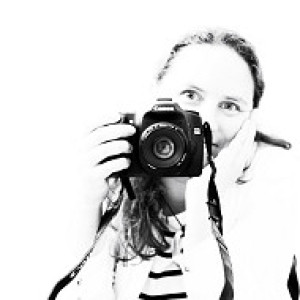

Like daughter...
... like mother. Tired!
[finished version on my [url=http://www.blipfoto.com/entry/1396788]Kinda Horrigans[/url] journal]
The main bit of processing with this was the conversion to black and white. However, before converting it, in Photoshop, I selectively sharpened her eyes and also used the 50% grey layer set to overlay blend mode with a white brush to bring out some of the detail and the catch-lights. Oh, and in taking the picture I deliberately used a very wide aperture of f/1.8 because I wanted her eyes to be sharp and the rest of her features to be softened. It also meant that, knowing I wanted to convert this to black and white, I could keep the ISO down in what were very poor light conditions.
After that, I used Silver Efex Pro to make the conversion to black and white going for a fairly high contrast conversion to throw the light onto her face and eyes. Back in Photoshop, I duplicated that layer, then used Filter > Distort > Lens Correction to apply a vignette which hid the too light bit of fabric in the bottom right hand side. Using a layer mask, I could then paint out the vignette on all other areas because all I wanted the vignette for was to do a sneaky bit of hiding of stuff!
Finally, gave it a slight crop, flattened... and saved.
Tip of the day:
Knowing how to expose your images correctly (where correctly = in the way you intended!) means understanding a balance of aperture, shutter speed and ISO and juggling the three. However, if you want to see the effect that different settings have without taking a ton of pictures, then this available light exposure calculator is a handy little tool.
216
views
- 0
- 0
- Canon EOS 50D
- 1/100
- 85mm
- 400
Comments
Sign in or get an account to comment.


