
How To Make a Photo Book Online, Take 2
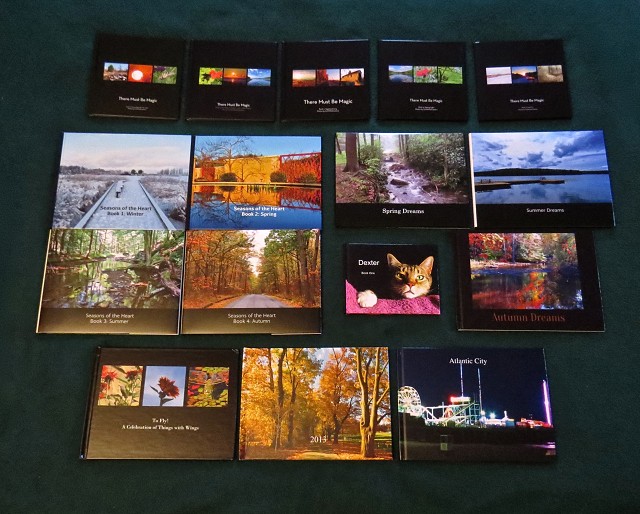
On Tuesday evening, my latest little photo book, Autumn Dreams, arrived just in time to help celebrate my 50th birthday. I started making photo books in the fall of 2012, and the latest arrival brings the total to 16. My goal this year was to make more books than ever, and I did that. This fall, I have made 5 books. I think that will be it for the year, so I seized the opportunity on this day to photograph the set, thus far.
I've Blipped my books twice so far. The first time, back when there were just 3 of them, I included instructions for how to make a photo book online. The second time, there were 11; and I wanted to update the instructions from the first posting but I didn't have the time. Well, finally, I took some time to review all of my books and update the instructions. So I am including them here.
This is a community of Blippers who love to take pictures, so I suspect many of you have a bunch of photos of your own. I love to make photo books, and I highly encourage you to give it a try if you've never done it. I am in the U.S. so the companies I talk about are based here, as far as I know. Different photo book companies may be available in other countries. I know the instructions below are a bit chatty, but I wanted to give others the benefit of my experiences. As with all things, take what is useful and toss the rest! :-)
1. Take LOTS of pictures, using a variety of settings, and upload them to your computer or external hard drive. I’m on a Mac that has an easy-to-use photo program called iPhoto, so that’s what I use.
2. Tag or label your photos with keywords after you upload them, delete the ones that aren’t keepers, and develop a system for labeling or flagging favorites. I have a set of more than 100 keywords that I consistently try to remember to use. For instance, I have a Blipfoto keyword that I use to tag any picture I’ve uploaded to my Blipfoto account. Some keywords relate to the subject of the picture (rabbit, bird, moon, food), and others identify where the picture was taken (MillbrookMarsh, Arboretum, PSU). Also, every time I upload a set of pictures, I review them right away and flag a handful that are my favorites.
3. Be sure to BACK UP your photo collection. This is important! You should always have the original photo library PLUS a back-up that is kept on a separate device. Also, ideally, you would keep the original and back-up copies in separate locations (for example, one at the office, one at home). Having MORE than one back-up copy is even better.
4. If you plan to make lots of things with your photos – be it photo books, or mugs, or calendars – you may find it helpful to create a photo project notebook for yourself. I have one (it’s quad ruled for graphing), and in it, I make planning notes for each of my projects. I keep track of things like standard elements for inclusion in each book, working titles, keywords, lists of pictures I hope to include, ideas about quotes, drawings of layouts I like, etc. And in it, I track the date when I started the project, the date when I ordered it, the amount of time spent on each project, which company I ordered it from, how many photos made the final cut, what I could do better next time, etc. If a project I’m planning involves a specific photo shoot, the notebook might include sketches of what I hope to achieve, as well as a list of props needed.
5. Choose the online photo book company you want to use to make your book, and create an account. For 5 of my books (the There Must Be Magic series), I used Shutterfly. I found their site user-friendly and I was very satisfied with the quality of pictures in the books they made for me. They allowed me to create photo books and save them as “projects,” work on them over time, and then order them when I was ready. This is a nice feature and every site I worked with had it; it’s too overwhelming to make a book in just one sitting. More recently, I made several books using Picaboo. While I didn’t find their site quite as intuitive and easy to use as Shutterfly, over time, as I used the site upon several visits, I became more accustomed to the interface and discovered that many of the features available on Shutterfly were also available on Picaboo. I’ve also used MyPublisher, York Photo Labs, Snapfish, and Collage.com, as well.
6. When planning a new photo book, start early enough that you can allow yourself at least several days or even a week or two to make it. Sitting down and brainstorming for 15 minutes is a great way to start. First, you might think of a theme or a unifying concept for the book. Or maybe you want to make a SERIES of little books? Make a list of the things you might want to include, right off the top of your head! Then go through your photo collection and start to find the specific items you’d like to include - keywords and flags can help you find the images you are looking for. Also, create and use a keyword of some kind to label the pictures you then select to include in your new book. I picked out the photos I wanted to use in Book 1, and then I attached the keyword Book1 to all of them. The ones I wanted for Book 2, I labeled Book2, etc. I later discovered it would be easier to tag the photos if I made my keyword start with a different numeral: 1book, 2book, 3book, etc. And even more recently, I realized there was no need to be so stingy about keeping the keywords short, so I added a brief book title to each of the keywords (examples: 1bookHeavenBeneath, 2bookSunshineFreedom) to make it easier for me to tell which book each photo appears in. A process I use for reviewing my (quite large) photo collection includes looking through photos I’ve posted to my Blipfoto daily photo blog, my Facebook “timeline” photo album (and any other recent Facebook albums), and flagged (favorite) photos from my collection.
7. If you plan to make a series of books, you might decide up front on a common design or title or theme that unifies them all. For instance, 5 of my little books, which I made using Shutterfly, all have a similar design, title, cover page layout, and back cover. The front cover includes the title and subtitle, as well as 3 photos against a black background. The back cover of each includes a copyright statement and a different silly picture of our tabby, Dexter. (Hey, they’re my books; I can do whatever I want!) I also came up with a name for my own publishing company: Skittering Vole Press. On the back cover of each book, near the picture of Dexter, is this statement: “A tiny little publication of Skittering Vole Press.” For each of those 5 books, the only words inside each book are a quote on the first page that I selected to represent much of the content of the book; I called the series There Must Be Magic, but each book’s subtitle, I derive from the unique quote I’ve picked. Since then, I have made a second little series of 4 books - the Seasons of the Heart series - using Picaboo and MyPublisher. I’ve made a few one-offs about special topics or places. And yet a third series of books - the Dreams series - is three-fourths of the way done. It has been my experience that the “theme” books, using photos that span more than just a few months, take longer than the seasonal books (spring, summer, autumn, winter) that I tend to like to make. Most of my little books have been assembled in anywhere from 3 to 8 hours. The quickest one I ever made was the 2013 book; in fact, it practically made itself. I got up on New Year’s Day morning this year, made it in an hour or so, and placed the order before I even had breakfast; it was just there (to be fair, though, it included quite a few photos that had already appeared in prior books, so I may have been cheating a little). The slowest one to make was To Fly, which took me nearly 11 hours, ended up using 164 photos (the most ever), and involved sorting through tens of thousands of bird, butterfly, dragonfly, and bee photos across several years.
8. Try to be realistic about how many photos you can include in one book. I initially identified about 150 photos for my first little 8-inch-by-8-inch book, but in reality, the 20-page book only fit about 85 photos. I more recently created several 20-page 8-1/2-by-11-inch books, and each of those fit only about 75 photos. So be prepared to winnow down your collection or select a book with more pages (more pages will cost more $$ as well). The largest number of photos I’ve ever managed to fit into a 20-page book was 164, but I have to admit that some of the pictures in that one turned out quite small.
9. Make any edits to the photos that you might want/need to make (I did this in iPhoto). This might include increasing the exposure for dark shots, straightening the photo (especially if there are lines in it that people would expect to line up with the horizon), retouching, etc. Some but not all of the photo book company interfaces also facilitate editing of photos once they’ve been uploaded.
10. Export the pictures that you want to use into a folder on a flash drive; this makes them more portable. iPhoto gives various options for the size and JPEG quality of photos when you export; I usually pick “full size” for size, and “high” for the JPEG quality. High quality gives me about a 4 MB file, while medium gives me about a 2 MB file.
11. Photo companies that allow you to make books give you lots of control over individual images, in that you can usually adjust the images or make them bigger or smaller on the actual page of the book you are working on. If that is not the case, you may need to spend some time cropping in advance of upload. If so, go through the photos on the flash drive and crop the photos as you see fit. (I keep both the original and the cropped version on the flash drive.) Be sure to leave some extra space around any person or object you want to feature in each shot, as you may need to custom crop some of the photos later, depending on the shapes and sizes of pictures you need for your book. For instance, if you are making a SQUARE photo book, you may find yourself using mostly SQUARE photos.
12. Here is where you might set aside a day or two to take a breather. Come back later with a fresh set of eyes and reevaluate the selections you have made so far. Are there any photos you want to remove? Any whose style or content does not fit in with the theme or mood you are thinking of for your book? Anything that will make you (or anyone else you intend to share it with) sad? If so, get rid of it! It will be easier, when you are working in the online photo system where you will make and order your photo book, if you are working from a smaller, rather than larger, photo set. Interestingly enough, while I take quite a few monochrome shots in my daily life, very few of my mono shots make it into my photo books. For some reason, my eye just prefers color in a picture book.
13. Once you’ve picked the online photo book company you want to use, created an account, and selected and edited the photos for your book, upload your photos. Allow yourself some time for this, as it may take a while to upload the photos you’ve selected. Most sites should let you upload in batches and place the photos into folders and groupings. When I uploaded pictures into Shutterfly, I placed my photos into a single folder I simply called Book1. With Picaboo, I had to create a project first – for instance, a book – then select my photos to upload, give the project a working name, and complete the upload. With MyPublisher, you download the software to your desktop, make the book, and then upload the whole thing; the resulting file can be quite large and may take a while to upload, so be sure to do that part of the process in a place where you have plenty of time to spare and a robust Internet connection.
14. Surprisingly enough, for a person who has as much to say as I usually do, I did not include much text in the books I made, but you may want to. I would advise that you have most of the text written and edited - maybe in a Word document that you can cut and paste from - before you begin creating the book online. The choice of where you want to place the text in relation to each picture will help you select the specific layout for each page. Select text size, style, and background color for contrast and readability (italic font tends to be less readable than regular font, for instance).
15. On Shutterfly, they allowed me options to make a book using a “custom path” or a “simple path.” The simple path will place photos for you. The custom path was what I used, and it was quite easy and gave me lots of choices. On Picaboo, it offered to have the site construct the book automatically for me, or I could make it from scratch myself; yes, I chose the “from scratch” method there too! Many sites offer video tutorials on how to make books using their sites, but I have to admit that while I’ve made 16 little photo books so far, I’ve never watched a single tutorial!
16. Think of a name for your book and flip through the styles or themes available on the photo site. You will have many choices about the style for your book. I generally prefer a hardback book, and I like the look of a book in a book jacket when it is available at a reasonable price (a book jacket also gives you a bit of additional interior space to work with, as you can place photos and/or text inside the wrapped jacket). As for the photos themselves, I like the way photos look against a crisp black background. So, with Shutterfly, the style I picked was called Modern Black, with a shiny black hardback cover. With Picaboo, I picked a theme of All Black (however, it placed a white border around each photo, giving the overall effect of a scrapbook, which I didn’t like quite as much). You can usually choose which photos to place on the front and back covers (except for Collage.com, which did not allow me to place either my own photos or text on the back cover). Shutterfly gave me lots of choices for the front cover - one picture? or several? words above the pictures? or below? The cover options for Picaboo and Collage.com were more limited. You should also be able to select font color, style, and size. Before selecting a font size, think of who your book is for. If it is for individuals with older eyes, they may appreciate a larger font size and good contrast between text and background.
17. Carefully review your options for page layouts. You will have LOTS of choices about how many photos to place on a page, how to group them, and where to place text in relation to individual photos. Almost all of the companies I’ve worked with provide tons of options for layouts with 3 pictures, 4 pictures, etc. The most recent one I used, Collage.com, didn’t offer such choices, which initially confused me, but I learned I could drag and drop as many photos onto a page as I wanted and then mess around with them. I always include a number of different layouts throughout the book, but I tend to like the look best when I match layouts across a 2-page spread: 4-photo spread on left, and a matching or mirror 4-photo spread on right. In the end, my little books have averaged around 4 pictures per page. I made just one photo book where I included as many as 9 to 13 photos on a page, and the resulting images turned out a bit too small to be very visible, so I think I’ll stick to no more than 4 or 5 images to a page from now on. I rarely include full-page photos; unless it’s a really special image, that’s a lot of real estate to spend on a single picture (and if you’re generally using 4-pics-a-page layouts, that’s 3 other pictures that you don’t get to include). Take your time deciding these things; this is the fun part! At least I think so. If you have little patience for this sort of thing, you might want to pick a “simple path” with fewer choices.
18. Always consider the relationship between photos placed on a single page, and think about whether there should be an organizing theme to each pair of open pages (verso on the left, and recto on the right). For instance, do you want to place all of the butterfly photos together, or scatter them throughout the book? Do you want to devote a pair of pages to a particular place or subject? Is there a color scheme or theme motif you want to repeat in several images across the 2-page spread? Is there a natural order to the images in the book, a story that will be told from front to back? Chronological order is always an option, and some sites allow you to click a button and automatically arrange the photos in chronological order. You will especially want the pictures on your very first page to pop and engage the attention of the viewer. From an esthetic perspective, the covers and the first and last pages are very, very important.
19. Be sure to include your name somewhere. And don’t forget to include a copyright statement (simple as this: copyright 2014 GirlWithACamera)! I usually put both on the outside back cover, but you can put this wherever you wish.
20. Get the book ready and then set it aside for a day or two. Come back and look through it at least one more time, looking at every single thing, doing a final review and edit on any text, and approving final layout. Look closely to make sure that subjects of photos are properly centered, and that everything that you hoped would show up, does. In the first book I made, I realized just before printing it that the square layout I chose for a photo had chopped off part of one of my dragonflies! If this happens to any of your photos, you may need to go back to your flash drive, re-crop your original photo, upload it to the photo site, and use the modified version instead. There were pictures I loved that I did not end up using because the shape of the subject just didn’t work in any of the layouts I selected. Also, I found that when I came back to the book after a day or two, I sometimes had a modified opinion on which photo should go where. Are there photos you didn’t include yet that you will just die if you don’t include? Add them now, before it’s too late! Does every single page make you smile? If not, now’s the time to change that! If you have a set of standard items you usually include, it may be helpful to keep a checklist of them, and actually check the items off one by one, to be sure they’ve been included. Surprisingly enough, in the heat of the moment of clicking that final “order” button, I have found that it is VERY easy to miss basic things. Check whether the font you’ve picked is big enough to be visible, whether the background to your images is the color you prefer (yes, look at EVERY page), whether the spine has the background color that you want (if you don’t set the spine color, it will probably be white) and the words on it that you want. (For the record, for all of my books, at 20 pages each, the books have been skinny enough that it wasn’t really possible to fit text on the spine, so I simply omitted it.) I also go back and review prior books, to see if I’ve duplicated any photos or themes; this is my big chance to make modifications, if necessary.
21. When you think you are ready to order, look for specials! Photo books (and shipping) can get quite pricey, and you can find discount coupon codes online for many photo companies. For several of the books I ordered, I had been given special promotional codes to use to get each book - 8 inches by 8 inches square, with a hardback cover - for free, but shipping was still about $8 per book. The going rate for a basic 8-inch-by-8-inch book or 8-1/2-by-11-inch book with just 20 pages, by the way, appears to be around $25 to $30. Larger sizes cost MORE. Always a bargain hound, I joined Living Social (livingsocial.com), which sends me daily offers that occasionally include great deals on photo books from various vendors; I often purchase photo book vouchers at deep discount that are good for several months. Also, when you order, check to be sure that there haven’t been any unintentional add-ons (such as fancy paper, lay-flat pages, gloss, etc.) beyond those you wish to include. Make sure no boxes have been clicked that you don’t want clicked. Watch for specials on upgrade features such as glossy pages, which MyPublisher offers for around $10 extra per book. I ordered one book from them that included the add-on of glossy pages for free and the resulting images and colors were really sharp and fantastic, better than in any other book I’d made before that. For the regular add-on price of $10 per book, I don’t usually add the gloss, but the last time I ordered a book from them, the gloss was on sale for $5 per book, and I sprang for the extra charge. The glossy shine really makes the color POP! The gloss also makes the pages feel more substantial to the touch, and more resistant to spills and sticky fingers; if I were making a child’s book, I’d go for the gloss, just to protect the pages.
22. Order, enjoy, and share! When I ordered from Shutterfly, the company sent an immediate e-mail confirmation. Some companies will also give you 30 minutes to cancel your order. A day or two later, they sent me a link and a status update (the physical book arrived about a week later). The link was one I could share with others – in sharing this link, I gave others the opportunity to view my book, even if they didn’t have an account with that particular online photo vendor, and an opportunity to order a copy as well! Picaboo, MyPublisher, Snapfish, and Collage.com also offer several sharing options, including sharing via Facebook or via e-mail link. For York Photo books, the person wishing to view the book at the link you provide must first create a (free) York Photo account to save the project to prior to viewing. Note that copies of books make nifty birthday or Christmas gifts. So once you’ve made and ordered your book, keep an eye out for sales and special offers, in case you want more copies. And yes, once you’ve created an account, the photo book company will send you bargain offers via e-mail occasionally; and many of them run discounts prior to major holidays.
23. A final step that I take (yes, the devil is always in the details!) is to go back to the original photos I tagged in iPhoto and update the tags or keywords and any project summaries. I added a new keyword called AlmostBook1 and attached it to the photos that were almost (but not quite) used in my first book; and removed the Book1 keyword from them. This is helpful when creating new books later on; I can go back and easily determine whether I’ve already used a favorite photo in a prior book. Or if I’m making a new book, I can choose to consider including some of the shots that almost were included in a prior book, but didn’t make the final cut. I have recently added a keyword UsedInABook, and I use it to tag all of the pictures that have made it into one or more of my books. And this fall, when I finally got to the point where I had quite a few books, I created a Word document that is a master list of my photo books. In it, I include for each book the book title, screen shots of the front and back covers and first and last pages, the quote if there is one, the number of pictures included, the date range of photos, the iPhoto keyword, and the total file size. To date, I have used 1,286 photos in my books; 505 of those were Blips. To think, it all started here with . . . There Must Be Magic. :-)
The song to accompany this photo echoes the theme of my latest "Dream" series: Bruce Springsteen, with Book of Dreams.
Comments
Sign in or get an account to comment.


