Learning To Light A Glass
After yesterday's epic fail, I returned to my home lighting experiment tonight with renewed purpose and a slightly better idea (I think).
Light fascinates me. That may explain why I love photography. It no doubt also explains why I spent a few years during and just after school learning lighting design for theatre and music concerts, and touring with some bands doing just that. So, I approached photography loving B&W photos for their artistic and atmospheric use of light and shadow, and I'm very interested in utilising light in both my B&W and my colour photos. I never use the built-in flash, tho I would like a flashgun that I can bounce light off places for some shots.
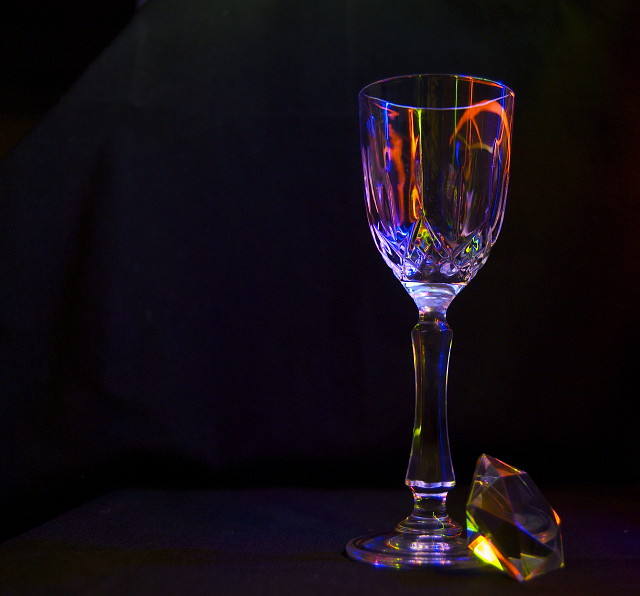
Yesterday's shot was far too elaborate for my home lamps and total lack of forethought. But today's experiment was much more achievable. I do have some weird lighting - one of which may get it's debut here at some point. The other, used to light this shot, is a CD rack made from different coloured sheets of neon perspex and backlit so the whole thing glows. That was the only lighting I used for this. The plan was to light the glass from one side with it and snap away. I used some black napkins draped over my stereo system to create the black backdrop, switched off all the house lights and then moved the glass around with my head on the cabinet (to get the camera's perspective) until I found a spot with plenty of different colours being picked up by the glass. Then, I set up the camera (utilising my pro studio gear - one dvd case as supermini tripod, and a £1 coin as my lens stabilization mount), set the dials and snapped away.
I took a few shots all at different shutter speeds to see the effects of changing the shutter speed for this (keeping everything else constant). And then picked one of them (I'd pushed it up two notches - whatever 'up' means in this context...gimme a few minutes and I'll try to figure it out....it made everything darker).
After dumping into iPhoto, I cropped the image to cut out the edge of the CD rack that was in shot, and boosted the saturation very slightly and lowered contrast (again, very slightly) to make the black backdrop completely black. Or as close as I was gonna get.
And voila! One picture. I think I more or less achieved my goal, and it was fairly simple. No real post-pocessing to make it look like it did, just playing with weird lights. I like weird lights. Did I mention that yet?
I'm not sure if I could have got a better shot with a bit more time spent trying different apertures and stuff. Maybe. Maybe some manual focus and a tighter shot would have worked. Or a macro lens. There's not as much detail as I was hoping for - some of the edges of the glass look a little, um, blurry or noisy maybe to me. But that's by the by really, I've learned a bunch of stuff and got what I consider a pretty cool and quirky picture without using photoshop (or other cool software programme) to bring it about. Score!
Some shots of the set up so you can see the CD case and everything have been posted over at my blog http://framersintent.tumblr.com/ right now, as proof of my non-shopping. And because I'm stoked this one worked! :-) (update: they'll apear as a slideshow - two shots similar to this but with different shutter speeds and zero editing, and then two shots of the CD rack, one very dark, the other showing the glass and the dvd-case-supermini-tripod I had custom built for this piece...)
Update:
Okay, so the black backdrop isn't totally black. Damn. But close enough for now. I could have edited it more strongly and made it totally black, but the point of this one was to create a cool pic that looked maybe photoshopped without photoshopping, so I went very sparingly on the edits.
Second Update:
I really need a better backdrop. The napkins just aren't cutting it, even if they are from Habitat and thus "posh". Just slant your monitor a bit! ;-)
485
views
- 3
- 0
- Nikon D40X
- 1/1
- f/4.2
- 28mm
- 400
Comments
Sign in or get an account to comment.


