
Rivals
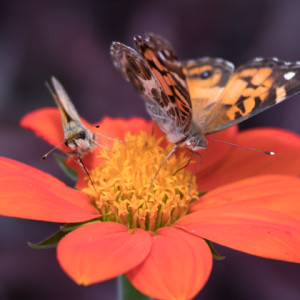
Sally Skipper received a frosty reception when she seated herself at the dining table occupied by her long-term rival Frieda Fritillary, who immediately shot her a dirty look, turned her back and flew to the next table. It seems that during their last competition when Frieda won the World title, Sally accused Frieda of cheating and using performance enhancing drugs especially when she saw those beautifully developed wings. As Frieda flew away, Sally murmured "cheater" under her breath and Frieda shot back: "loser!" #AOG2016 — Opening Ceremonies tomorrow!
---------------------------------------------------
In this last installment of the insect macro tutorial, I will review my approach to post-processing. I work in Lightroom, and will refer to features found in that program, but I am pretty sure other programs have many of the same features. I always shoot in RAW, so my images always need some processing. Sometimes it is just a little contrast and cropping, but since I have little control over the conditions and setting where I shoot the insect images, I sometimes do a little more to make them pop.
When I first look at my insect macro images in Lightroom, I always zoom in 1:1 and sometimes 2:1 to see if they are sharp around the eyes. If they are not, they go to the trash bin. So before I begin my processing, I start with an image that has the eyes and surrounding areas in focus. Then I make tiny little adjustments that will sharpen things up ever so slightly, without using the sharpening tool. I start with global adjustments.
Global Adjustments:
Highlights and Shadows: I have found that making slight adjustments in the highlights and shadows can bring out details, especially if photographing in sunshine. There is no magic formula - I just use trial and error until I see what I like.
The Luminance sliders are my favorite. I never do anything with color saturation. I find my camera produces images where the colors seem nicely saturated. I will play around with the color luminance sliders, however. Just a little increase or decrease in the luminance of the individual colors can really bring out some detail. They only work globally so keep in mind that adjustments will affect the whole image. I have loaded the original raw image of today’s blip in extra so you can see the difference. Look at the difference in the center of the flower, this was accomplished by using the orange, yellow and green luminance sliders, and then a little clarity and contrast added locally as will be explained next.
Local Adjustments:
I am a heavy user of radial filters for applying my adjustments exactly where I want them e.g. increasing contrast and clarity around the eyes, adding lighting effects, enhancing a texture and adding a subtle (or not so subtle) vignette. I like the radial filter much better for adding a vignette because I can darken (or lighten), soften the background exactly where I want and control the feathering, rather than having a distinct vignette equally at the edges as is produced by the vignetting tool.
Sharpening can be done globally or locally. If you use it globally, after using the sharpening slider, hold down the option key and slide the masking slider over to control the areas of sharpening. I might use the sharpening slider at the very end and often times not at all or only minimally. I usually sharpen locally via a radial filter rather than globally. It is a tool to be used cautiously, because if your photo isn’t in focus, no amount of sharpening will help.
I hope you have found this helpful. I have tagged each installment with #Insect Macro Tutorial so it is all in one location and can be easily found should you ever want to refer back to it. Thanks to all of you who took the time to read through this. I will do a quick summary tomorrow with links.
And ..Tiny Tuesday results…….. mañana.
Comments
Sign in or get an account to comment.


