February Daily Challenge - Me & Me!
Day 19 of KaliBug's February daily challenge - Feb. 19th: Picture of you or something that symbolizes you, and MissyMoo's February daily challenge (I am...: Share something about you. Are you tired? Brave? Strong? Happy? Or even take a self-portrait.).
Thank you to everyone who sent greetings, gave me stars and put me in the spotlight for my 365th blip yesterday. Today (there having been a Feb 29th within this last year) marks the completion of my first calendar year of blipping - any excuse for another celebration!
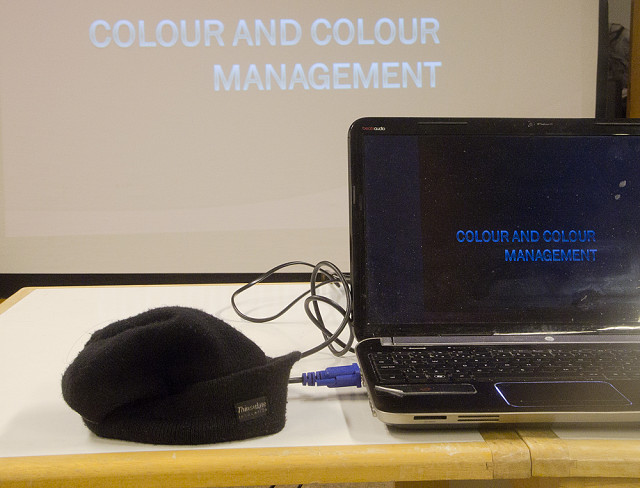
Both challenges line up again tonight, so here you have things being prepared for me giving session 3 of my series on Colour Management at my camera club. The laptop with the Powerpoint on it, the projector and screen, and a little bit of me - my woolly hat that keeps my head warm in cold weather. It says a bit about me I hope!
For those who commented yesterday about the amount of work in putting together yesterdays blip this is how it was done -
My blips are almost always reduced to a maximum dimension of 1000 pixels and saved in a folder called Blip - that made life easier.
Each row of images was made individually -
1. Under "file/scripts/Load Files into stack" open all of the images for one row - that loads them all as individual layers
2. Change the canvas size so they will all fit (1000px x number of images plus a bit to allow a bit of a gap wide, 1000px plus a few high as mine are max 1000px high),
3. Drag the first to one end of the canvas, the last to the other end,
4. Select all the layers and under Layers you will find align and distribute - a touch of each will spread them all out in a nice aligned row in a couple of seconds, try a couple of options and see which works best.
5. Merge the layers (don't flatten - that will put white in between the images) and save.
6. Repeat for each row.
For the background
1. Create the background image, then it needs to be tiled.
2. Change the canvas size so it will be large enough for all the rows with a bit of space around the edge
3. Duplicate the image by copying the layer, moving the new layer to line up, merging the two and copying again
4. Repeat until you have filled the canvas.
Putting them all together
1. Open the first of the rows
2. Drag the tab with the file name of your first row (at the top of your working window) down so that it detaches from the rest and you can see both the background and your row
3. Select your first row and drag the layer from the layers palette onto the background image, and position (roughly) the first row on the background.
4. Close the first row and repeat the process for each row in turn.
5. Select the layers for all of the rows (e.g. everything except the background)
6. Do the same Align and Distribute trick you did on the rows, so they all line up and are evenly distributed.
7. Select one layer (one of the rows) on the Layers palette, right click, select Blending Options.
8. Add a Drop Shadow and adjust as required (or other effect - it's your choice)
9. Right click, copy layer style, and paste on each rows layer to apply the same effect to every row.
10. Add the number 365 (taken from the original background image), resize, rotate, add a drop shadow.
11. Reduce the size of the image, and save.
It took me almost as long to type that out as it did to do it all. Photoshop did most of the work. The file does get large - I saved it before reducing it in size and it was 3GBytes! It would have been even bigger if the images were not prepared in rows, but individually.
Comments
Sign in or get an account to comment.


