Monday...
https://www.blipfoto.com/LmiriamC suggested a You Tube video she had watched as regards gelli plate printing.
I watched it https://youtu.be/E6_qyrPHxgc this morning and had a go.
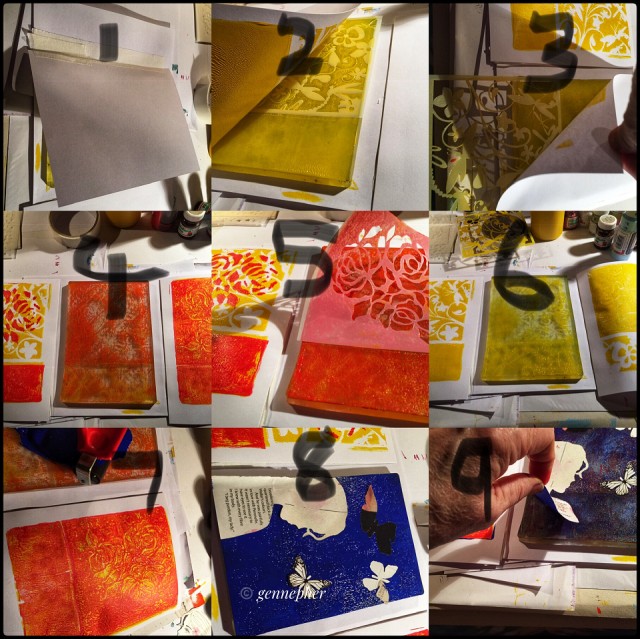
I took 18 photos as I progressed to show you what I did, and then I numbered the pics within each collage. The pics should be in order but the collage sometimes mixes my order up.
So this is what I did before dawn this morning...
1. 7”x5” gelli plate on middle A4 sheet of paper (why middle? Because on my first try there were several pieces of paper under the gelli plate and when I taped the two side pieces on the paper so they would go over same place on gelli plate for subsequent prints, they didn’t because they were taped on different pieces of paper and parted company from the gelli plate).
2. Then I brayered gelli plate yellow acrylic and placed a stencil on it (I only had a few tiny commercial stencils smaller than the gelli plate so I couldn’t do exactly what the You Tube lady did). The paper on the left was pressed against the gelli plate and stencil, and you can see a bit of the design as I began to pull it up.
3. You can see where I placed the same stencil at the bottom of the gelli plate before I pressed the right hand piece of paper on the gelli plate.
4. You can partially see how both left hand and right hand papers turned out. Ahhgh...naughty words... the collage put photos in wrong order. I did check but I didn’t see it. Okay so look at number 6 after number 3. Then number 5 to see the red which has been brayered on to the gelli plate and the stencil (another one) which had been placed on the gelli plate, and the left piece of paper had been pressed into it. So, also in number 5 you can see me lifting the stencil off before I pressed the right side taped paper on to the gelli plate. Then in number 4 you can see the gelli plate and a partial of each side prints.
Now let us go to number 7 and you can see the ‘ghost’ printing of the right side piece of paper, and I am brayering the gelli plate blue. Also you can see some (actually only one of the magazine cut outs I had previously done, there were 3 butterflies as well).
8. Is the gelli plate brayered blue and I have placed the woman’s face on the left, and also 3 butterfly cut outs into the acrylic paint.
9. I then put the left taped down piece of paper over the gelli plate and stencils and pressed down, and you can see me lifting the delicate magazine cut outs without tearing them...but when I got to big butterfly at the top it refused to leave the blue acrylic...it was well and truly stuck...oh well...
To see the rest of steps 10 to 18 you are going to have to look into extras. Sorry about that, but those of you who are looking at this via the Blipfoto app are not going to see the extra photo (at least not on the apple Blipfoto app, I don’t know what the android Blipfoto app is like).
10. I am still lifting the lady!!!
11. As I said the the last butterfly wouldn’t come off the gelli plate. So 11 is just the gelli plate with the stuck paper butterfly before I pressed the right hand paper to get the ‘ghost’ print.
12. Is the gelli plate and a partial either side of the prints. I forgot to do the next step where the lady in the You Tube video suggested putting water with a fine brush on the gelli plate on part of the image before doing the ‘ghost’ print on the right hand piece on taped paper. But I tried I somewhere else later and I thought Wow this is a great little effect.
13. By this time I have decided to do no more on the two initial taped prints either side of the gelli plate. But I left them there while I did the next bit. Okay, 13 photo is upside down...sigh... but I put some white pearlised paint on the gelli plate. Then brayered it.
14. Is a print I took of it on a separate piece of paper. It is very delicate and actually looks pretty, but doesn’t come over well on the photo.
15. I brayer the gelli plate purple and pull a print on another piece of paper. Wow, this butterfly is amazing. This is the butterfly which stuck to the gelli plate and cannot be removed without tearing. A very happy accident!
16. I pulled another print on the same gelli plate (no more acrylic applied). And I have this more ghostly image of the butterfly. Looks good. What is happening is the edges of the paper butterfly stuck to the gelli plate is beginning to tear but still staying with the stuck butterfly, thus creating those ghostly white edges.
17. I brayer black on the gelli plate, and you can see on the left the initial printing I was doing.
18. I pulled a few prints off the black and this one is the second pull. You can see where the stuck butterfly is, but it is tearing off quite a few layers by now.
So that is this morning early!
Actually, not quite! I had rather encrusted paint on the gelli plate by now. And the remains of a paper butterfly which stubbornly refused to come off.
So I used some baby wipes...but it was barely shifting. So placed a baby wipe over gelli late and brayered it with dirty brayer. Result was a clean brayer, a print on the baby wipe which has been placed on a flat surface to dry.
But still loads dried encrusted stuff on gelli plate. So I tried another piece of paper, pressed it in and lifted it and Wow, loads of layers of different coloured paints. Did a couple more, but by this time Popeye needs his breakfast....
Gelli plate had to be soaked in warm soapy water...
There are no mistakes in gelli printing...
Thank you for your lovely comments and love.
Take care x

Comments
Sign in or get an account to comment.


