Vortex Magic: Frozen Bubbles!
It's been very cold where I live due to the polar vortex, and I decided to experiment with photographing bubbles freezing at these very low temperatures. I'd seen magical photos of frozen bubbles online, and even tried my hand at it a time or two. The results I got, alas, were less than encouraging.
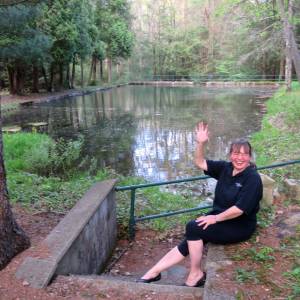
But on this day, I finally found success in this endeavor! Above and in the extras, you may see some pictures of my grand experiment. Below, I go into more detail on "how-to," to document my efforts and to provide suggestions for anyone else who may want to try this. Good luck!
It is my custom to include a song link with my photos, and for this posting we need a little something magic. So here is Steppenwolf, with Magic Carpet Ride.
----------------------A summary of my own experience--------------------
Penn State cancelled work on Thursday due to the cold, so I had some free time to play around with. I decided to try something I thought might be fun and creative: photographing bubbles as they froze. So I got out a bottle of bubbles I had bought at the store and started with those. My first bubbles were fragile and thin. They broke as soon as they hit the snow. I got a few pictures of one that lasted just a few seconds; it looked like a silver-gray pearl against the snow.
I had also seen a recipe online that mentioned dish detergent, water, and Karo light corn syrup, so I made a mix of that too. It was also too thin; too much water in the mix, I think. I can tell by the time stamps on my photos that I spent less than one minute outdoors on Thursday, discovering that both the store-bought bubbles and my first mix were not up to the task at hand.
Fridays, I generally don't work. So I had more time to play with my bubbles. It was snowing and in the single digits when I got up, and I was anxious to get out and work on my craft; it was my husband's idea that I should continue my experiment on the front porch, where the camera and I would be protected from the snow.
Friday morning, I woke up remembering that I had MORE bubbles somewhere, and I found them rather quickly. "Blow bubbles you can hold in your hand!" it said on the label. So promising! But alas, the mix, years and years old, was no good any longer. When I opened it, I discovered it had hardened into a goo that was almost the consistency of rubber bands. So much for bubbles I could hold in my hand!
So I took my mix of dish detergent, water, and Karo corn syrup, and I added more of everything to it. My bubbles kept breaking as soon as they touched ANY surface, so I got the bright idea to wipe the area where I wanted the bubble to sit with bubble mix FIRST, and then blow the bubble right onto the spot where I wanted it. This worked better, but my mix still seemed too thin.
I went out for three photo sessions on Friday. The limit on how long you can stay out is how long you can tolerate frozen hands. For there is no way to mess with bubble mix and photos while wearing gloves. So I went out in my boots and coat, but bare-handed.
(Eventually, I have developed a little system of wearing gloves, putting down the camera, taking off my right glove, dipping and blowing my bubble with a bubble wand, putting the wand back down, wiping my right hand, putting my glove back on, and picking the camera back up. Or if you're really careful, and minimize sloppage of sticky stuff, you can keep the gloves on.)
Another danger is that if you have your camera around your neck, and you start blowing bubbles through a wand, there is a risk that you will get sticky bubble mix on your camera. Let me assure you that this is something you Do Not Want! I tried a macro shot of a bubble and got too close, and the bubble exploded on my lens, leaving it with a colorful rainbow of sticky residue that I had to go back inside and clean off carefully.
So I ended up wearing the camera around my neck, but pushing it off to the side with my one arm, while I blew bubbles. Ideally, you might have someplace dry cleared off (like a small yard table) to sit the camera down on while you blow the bubble, and then pick the camera up and start taking pictures.
I went out around 10:30, 1:30, and 4:30, and my photo sessions lasted seven, ten, and six minutes. Temperatures varied from about 6 to 10 to 15 degrees F. A bubble's freezing took about a half-minute in the coldest temps; maybe a minute at 15 degrees. I found that my frozen hands appreciated a dip in warm water from the tap once I came back in from each session. ("Nobody knows how much you put into these things," said my husband, shaking his head, as he watched me come and go.)
After the first photo set, I came back inside and dumped out my bubble mix and started over. This time, I tried to get it closer to the ratios I had seen online: one part water, four parts dish detergent (any brand will do), and a dash of Karo corn syrup. I blew some bubbles indoors to make sure it worked, and it did. I got some pretty patterns on the bubbles in the morning and early afternoon sessions, but the light just wasn't what I was hoping for.
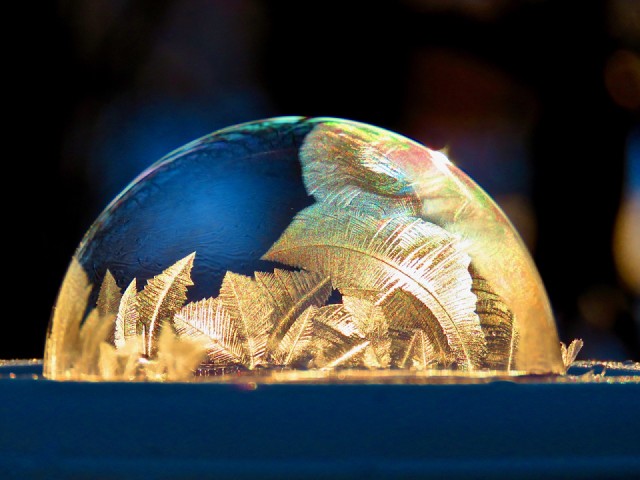
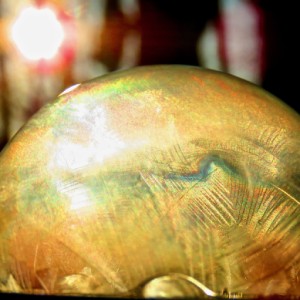
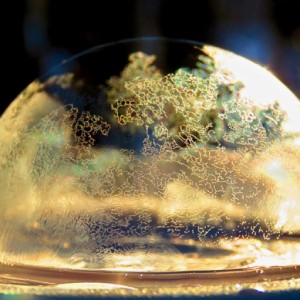
Then, around 4 pm, I saw golden light out the deck door windows, and I got a great big grin on my face. "There's the light I need for my bubble pictures!" I told my husband. I fed the cat his supper, and went outside in that gorgeous light for my final bubble photo shoot of the day. (All three of these pictures are from that last photo set.)
Out front on the porch, I'd found some flat spots on the railing that worked well to place my bubbles on. On the deck, there wasn't really anything like that. So I took along a lid from a small, round Rubbermaid food container to use as my base. Onto that base, I liberally smeared bubble mix. Then I blew my bubbles onto that very spot.
With the sun in my face, I blew my first bubble, and watched the frosty patterns appear as the golden light lit up my bubble like a tiny moon. My heart smiled. I experimented with shooting from different angles, but the results were best with the bubble between me and the light source. Finally, success!
----------------------Tips for making frozen bubbles--------------------
Here is a short summary of tips for photographing frozen bubbles, based on my experience (I'll keep adding tips to this posting to make it my canonical source):
Temperatures must be cold enough. In my case, they hovered between about 6 and 15 degrees F.
Conditions must be very calm. You don't want the wind blowing your bubbles around! They must be allowed to sit still to freeze.
Identify a place in your yard where you can work with the bubbles, such that the bubbles will be positioned between you and the light. There are slices of tree stumps along the edges of our yard. I use those as my "tables." I place my camera bag and camera on a small yard table nearby, and pull up a chair.
If you are thinking about going out for bubbles the following morning, the day before, check out your bubble-making area, and remove any snow you might need to (for example, from the chair you plan to sit on); this will help you avoid getting wet and damp and cold on the big day.
Know when and where the light arrives in your yard in the morning. The very nice, early angle of the sun is perfect for lighting your bubbles.
Get your supplies together first. Here were mine:
-one large container to put stuff in (you won't believe what a mess these couple of items turn into when they are slippery and semi-frozen and you need to carry them back indoors afterwards)
-one clear round Christmas ornament
-one container to sit that ornament on top of
-one container of bubble mix
-one bubble wand
-one paper towel
-one camera
-any additional toys or implements or props
Homemade bubble mix works best: four parts dish detergent (any brand will do, but consider what color you want your bubbles to be; I used the el cheapo dollar store variety), one part water, a dash of Karo light corn syrup (the clear kind, NOT the dark). Skip the store-bought bubbles.
Freshly made bubble mix tends to have more surface motion than older bubble mix. If you enjoy watching the bubble surface squirming around as the crystals form (which is delightful!), you might want to make your bubbles fresh each time, or simply add a bit of this and that to the mix you've already got, just before going outside.
About a half-hour before you go out to make your bubbles, sit your bubble mix on the front porch to start cooling it down. (When temps are in single digits, you may skip this step, as chilling the mix first may cause your bubbles to freeze way too quickly!)
Anticipate that you will have sticky fingers. Place paper towels in your coat pockets.
Make sure your camera battery is a good one; they go down quickly in such temperatures. In fact, you might do well to change the battery just before going out.
Make sure you have plenty of room on your camera's memory card; changing one outdoors at these temps, with sticky fingers, won't be any fun at all!
Anticipate and select your camera settings BEFORE even going outside; your cold, sticky fingers won't make it easy to change settings.
Be very careful with handling the camera once you have the sticky bubble mix on your hands. After you blow the bubble, wipe your hands with a paper towel and put your gloves back ON before handling the camera. Ideally, you would have someplace to sit the camera nearby while blowing the bubble, so you that can blow the bubble and THEN instantly pick up the camera.
Tuck a spare pair of gloves in your pocket, in case you get bubble mix all over your first pair.
At 6 degrees F, you've got about a half-minute of time with each bubble, to photograph the progression from clear bubble to completely frosted specimen. At 15 degrees F, you get about a minute. You'll need to move quickly.
Pick the spot where you want your bubble and slime it down with bubble mix. There, you have a perfect place for your bubble to sit! A smooth surface will work; if you don't have one, you can do as I did, and bring some other item (a container or a container lid, in my case; eventually, I began using a clear plastic Christmas ornament, with another small container as its base) to make your bubbles on. Sometimes, if my bubbles are sliding down the side of my ornament and misbehaving, I just blow the bubbles directly onto snow.
Do not get bubble mix on your camera lens while blowing the bubble. While taking pictures, do not touch your lens to the bubble. Do not let the bubbles burst onto your lens. This is all easier said than done.
Plan for multiple attempts, and be prepared to adjust your bubble mix, if it seems too thin. When I got the mix right, I could tell because the quality of the bubble was suddenly different. As the bubble started to freeze, the surface of the bubble would move and squirm and it was marvelous to watch. This is the Karo corn syrup at work, giving a dynamic strength to your bubbles.
As you plan for multiple attempts, anticipate that your camera lens will fog up when you run back inside the house. I allowed plenty of time between attempts because my hands were freezing; but allowing time between attempts is also a good way to allow the lens to adjust. (This is also a tip for shooting moon shots in the cold; be wary of the foggy condensation on the camera when you run in and out.)
Position the bubble between yourself and the light. Shoot from many different angles. Be prepared to delete many, MANY shots before even removing them from the camera. I ended up with about 150 shots, but I probably deleted at least that many.
Wait for the sun. A beautiful golden light makes all the difference. The "golden hours" around sunrise and sunset are likely to give you the prettiest light of day.
Don't be afraid to amp up the colors. I used the vivid setting on my camera for most of my shots, to boost the saturation. Upon uploading the pictures, I also adjusted the brilliance, black point, saturation, and definition upwards on almost every shot.
Consider what backgrounds you want in your shots. The bubbles almost look like little snow globes or moons. Placed against a darker background (trees, etc.), the glow can be very pretty, and quite dramatic. I enjoyed the shots I took that included my own trees. I can only imagine how this sort of thing would look against the background of the Arboretum's children's garden, for instance. (Maybe a project for another cold day!)
While those bubbles-on-the-snowy-ground shots LOOK great, it's very difficult to shoot bubbles that are actually down on the ground. It's hard to get the angle right for the light to fill the bubble, and getting up and down while dressed in many layers can be difficult (and even more so, as knees grow older, and at single-digit temps). For these reasons, my favorite bubble shooting happens on short stumps at the edges of my yard, which are within easy reaching distance when I sit in a nearby chair.
I have tried adding food coloring to my bubble mix. I mixed 2 drops blue and 1 drop red food coloring into blue dish detergent. My mix ended up purple but my bubbles did not seem discernibly purple. It got very messy. So far, I do not recommend food coloring.
If you want to include props, like little animals or crystals or things to your photos, be very careful and cautious. Do not take anything outdoors that you'll just die if it gets broken, or all soaped up with bubbles, or dropped into a snow drift! Place the item gently but firmly beside your bubble AFTER blowing the bubble. Be ready to wash off all items afterwards, as no matter what you do, they'll be somewhat sticky.
Fancy props (like a crystal ball) can be very nice, but may potentially outclass your bubbles. I had mixed feelings about that photo shoot, as the crystal ball itself drew all the light!
Additional ideas I have include: dropping a drop of food color onto a bubble as it crystallizes, and night bubble photography featuring Christmas lights (yes, I have a short string of blue ones).
Good luck, and have some fun! It may take a bit of work, but there's magic to be found in the cold!
Comments
Sign in or get an account to comment.


