The Frost Dragon's Crystal Hoard
When I was out making frozen bubbles the other morning, I had an idea for a subject to include in my bubble sets, and another idea about how to display it. I was messing around with my hearts, and I realized I wanted/needed a way to display them that would allow the item to sort of STAND UP inside my bubble for better visibility, and to allow me to keep shooting UP into the light instead of DOWN onto the bubble to show the item. I started thinking about using CRYSTALS inside my bubbles, and I have a Christmas ornament hanging stand that seemed like it would be just perfect for hanging one.
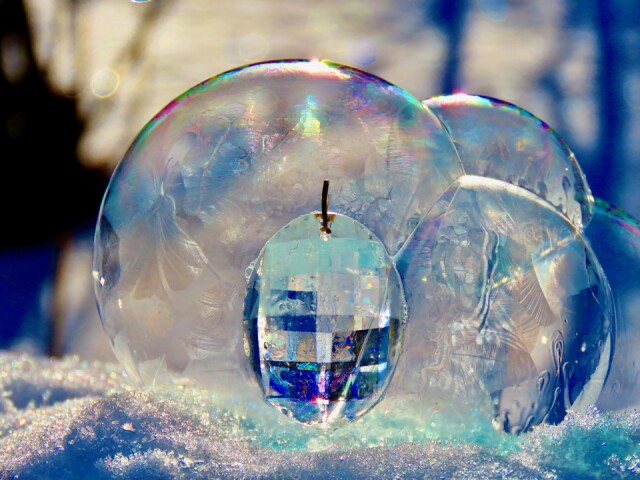
On this morning, I executed my concept, using some crystals I bought at the Grange Fair. I got out my ornament stand, dusted it off, and brought it out into the snow. Above is one of my best shots, and below I'll tell you all the details about how I did it. (And you can too!) But first I wanted to cut to the chase, and say that I absolutely LOVED how most of these turned out, despite some challenges.
This shot made me think that there is a Frost Dragon in our woods, and I have somehow stumbled upon its crystal hoard. Shall I try to remove this gem from its icy bubble and flee? Shall this gem be mine? Will the dragon try to catch me? Or will I be destroyed, in a blaze of fire and ice?* :-)
Okay, now here are the details on the how-to!
1. My ornament stand has a clear plastic base, a thin piece of metal curved on the side, and a hook at the top to hang things from. I had a few inches of snow on my stump slices, so it was easy to sort of SLIDE the base under the snow so that the hanging structure was practically invisible. The metal piece of the stand is to the right, out of frame.
2. I hung my crystal from a piece of clear fishing twine that was easy to erase from my final shots (if I wanted to) using my Mac's "retouch" tool in Photos. How is it hanging? Pure magic!
3. Bubbles reflect the colors they see in the world. So I got a lot of nice blues in my crystal (which is actually mostly sort of clear with touches of blue) reflected from all those blue shadows in the snow.
4. I violated my personal rule of not taking outdoors anything I would be afraid to lose, break, or otherwise ruin. Okay, so sue me. I WANTED CRYSTALS. I GOT CRYSTALS. I was very, very careful.
5. Any shiny or clear item you take outdoors to make bubbles with will be pretty much instantly slimed. My crystal was quickly covered in bubble goo. I wiped it off occasionally with my fingers, and got very sticky. Now the INSIDE of my gloves is sticky, because I always put the gloves on before I touch the camera. I'm thinking that a small container of fresh water would be good to dip my crystals in mid-shoot to keep them clear and shining.
6. I could not actually manage to blow my bubble AROUND the crystal, as I was blowing bubbles around the hanging structure. But that bubble is indeed smack dab bang right up against that crystal. It was the best I could do.
7. I got the best results when I placed the crystal on my near side, then the bubbles on the side of the light. It is an illusion that the crystal is inside the bubble. The crystal is just this side of it.
8. There is a sweet spot for me in the crystallizing process of my frozen bubbles. I like it best when the bubble is about 50 to 75% crystallized. As the process advances, the more opaque the bubble becomes. When it is done becoming, the bubble hardly lets in any more light. If you make frozen bubbles yourself, you'll know EXACTLY what I'm talking about. Yeah, the sweet spot.
9. I tried photos with two different crystals, a smaller one with a Man in the Moon, and this one. This one is far bigger. Guess what: BIGGER crystal wins! Hands down.
10. Depth of focus is an issue. I wanted BOTH my actual crystal AND my bubble crystals to be in focus. I typically shoot just a few inches from my bubble (which occasionally leaves me with a sticky lens when my bubble bursts, but that's the price of admission, folks). I found that both my crystal and my bubble patterns were in perfect focus in this photo when I made the shot from a bit further away. YAY!! Let's attribute this to both good luck AND some good planning. (This was not the case with quite a few of my shots; the closer the bubble is to the crystal, the better.)
11. I had been dying to try bubbles with a dandelion paperweight that I love. I had been fantasizing about it, practically forever. I did it on this morning. Guess what. No great shakes. I don't know. It just didn't do anything for me. So we'll cross that one off the list.
12. After-care. . . . It is important to corral all of your sticky stuff in one place. I always take a Rubbermaid container out to transport my photo shoot items in. It keeps them in one place. It also allows me to put sticky stuff in there when I'm done. I carry the container inside when I'm done and gently rinse off all of my sticky implements with lukewarm (NOT HOT) water. Gentle swirl swirl swirl, carefully dump out the water, not losing your smaller items down the sink drain. Gently place items on a tissue to dry.
13. Why. Why do I do this? Because I love it! It is fun and strange and magical, and despite the fact that it is messy and sticky as all get-out, it occasionally even makes me feel like I get a glimpse of God's handwriting! (See those little swirly things on the bottom right bubble. Those little loopty-loops? Yeah, that!)
So there are all of my tips and observations. Of course, the only song that MUST go with this photo is this one: Tommy James and the Shondells, with Crystal Blue Persuasion, from 1969.
As always, here is a link to my canonical list of frozen bubble making tips. HAVE FUN!
*Oh no, yet another hapless Blipper bites the dust! Ha ha ha ha!
Comments
Sign in or get an account to comment.


